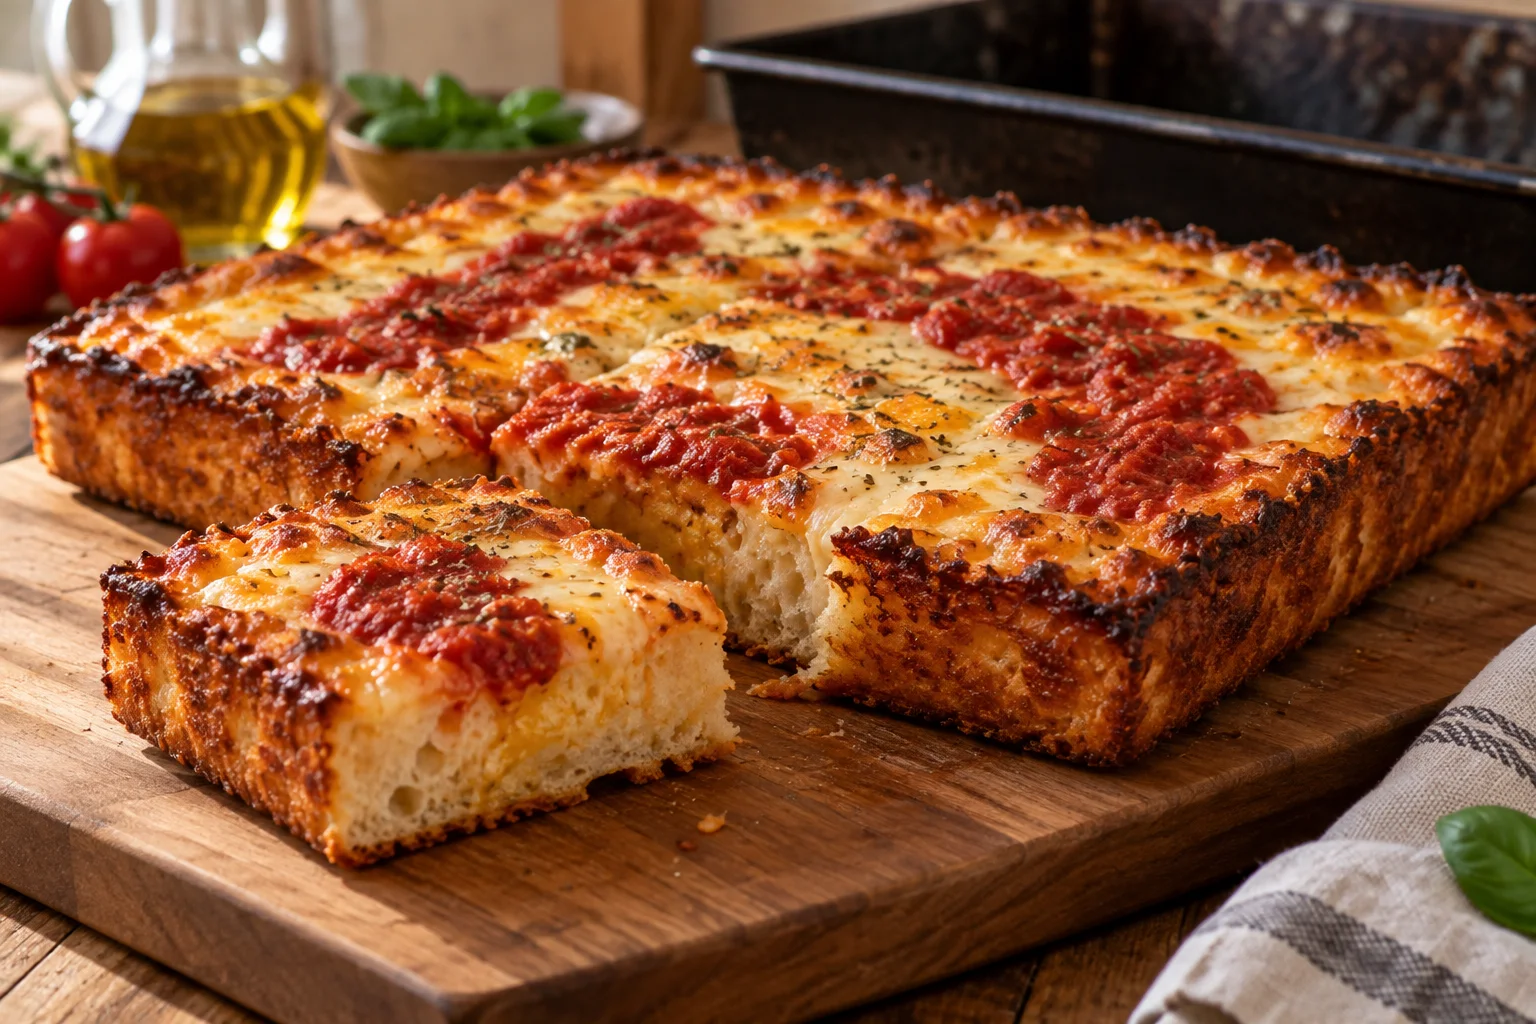
What makes this deep-pan pizza different
Detroit-style pizza combines a light, relatively thick base with a deeply browned cheese edge. The dough sits in an oiled metal pan. Cheese reaches the sides, where it forms a crisp crust during baking. Tomato sauce goes over the cheese, often in stripes. If you usually bake thin, round pizzas, almost the whole process changes: the dough is spread inside the pan, baking takes longer and heat must cook the underside beneath a substantially thicker layer of dough. A browned top alone is therefore not enough to judge when it is ready.
This format is convenient for a pizza evening. You top one large pan and cut the finished pizza into rectangular pieces. There is no need to pull a soft dough ball onto a peel during service. Instead, spend a little time matching the pan size, dough quantity and oven position beforehand. Too much dough in a small pan cooks slowly in the centre, while the same quantity spread over a huge tray produces a flatter base. The quantities below are a starting point for a metal pan with a usable bottom measuring about 25 by 35 cm.
The pan controls quantity and baking behaviour
Choose a food-safe metal pan with higher sides, around five centimetres or more, that is suitable for your planned baking temperature. Dark pans absorb radiant heat differently from light ones, so both the material and finish affect browning. A dedicated Detroit pizza pan can help, but is not essential for this method. If using an existing baking tin, check its temperature limit and care instructions. Glass or ceramic responds differently and is not a like-for-like substitute for the timings below. Use the pan you actually intend to bake in when calculating the dough.
Measure the inside bottom where possible. A 25 by 35 cm pan has an area of 875 square centimetres. A 20 by 30 cm pan has 600 square centimetres. Dividing 600 by 875 gives about 0.69. Multiply all the dough ingredients by that factor to keep a similar dough thickness. The original 400 g of flour becomes approximately 274 g, and 300 g of water becomes about 206 g. Reduce the toppings accordingly. Baking time does not simply fall to 69 percent, however, because the height, pan material and oven still influence the result.
Oil the bottom and sides in a thin but complete layer. For the larger pan specified here, start with about 15 g of oil, separate from the oil in the dough. Use a suitable brush to reach the corners. A dry strip at the edge may cause the cheese crust to stick later, while a deep puddle in the centre is unnecessary. Whether a new pan needs seasoning before its first use or arrives with a ready-to-use surface depends on the product. Follow its instructions rather than applying one treatment to every metal pan.
A soft dough for a light base
Start with 400 g strong wheat flour, 300 g water, 10 g salt, 8 g olive oil and 3 g instant yeast. This produces 721 g of dough. Hydration is 75 percent and salt is 2.5 percent, both calculated against the flour weight. The dough feels considerably softer than a firm mixture intended for thin rolling. The pan will do some of the supporting work later. You do not need to add flour until it becomes a compact ball that can be handled without any stickiness. That would change the texture you are preparing.
Combine the flour and yeast, dissolve the salt in the water, then work the water and oil into the mixture. Stir thoroughly until no dry flour pockets remain. Cover and rest for twenty minutes. With a slightly wet hand, lift one side of the dough gently and fold it towards the centre. Repeat around the bowl. After another twenty minutes, perform a second round of folds. The dough should become more coherent and hold together more readily than it did just after mixing. Avoid pulling so hard that you repeatedly tear the developing structure.
Keep the dough covered and let it rise until visibly aerated. At around 22 to 24°C, this first phase may take roughly two to three hours in total from mixing. Cold water or a cool kitchen extends the schedule, while a very warm room speeds it up. Look for gas bubbles and a softer, slightly domed surface as well as watching the clock. A rigid timetable is unhelpful when the dough remains dense in its bowl. For the first batch, allow a free afternoon of roughly four to five hours rather than a tight meal deadline.
Spread the dough into the corners in stages
Gently transfer the risen dough to the prepared pan. Release it from the bowl with a scraper instead of kneading it firmly again. Use lightly oiled fingertips to press it towards the corners. It does not have to cover the entire bottom on the first attempt. If it contracts, cover the pan and wait about twenty minutes before pressing it out again. Two or three gentle attempts often distribute the dough more evenly than one forceful stretch that leaves the centre thin while the outer parts remain bunched together.
Pay particular attention to the corners, where thick folds can remain while the area just in front is already flat. Redistribute those thicker areas with your fingertips without pressing all the air from the dough. Once the bottom is covered, let the pan rest, covered, for another 45 to 75 minutes or so. The dough should become visibly lighter again. The exact duration depends on temperature. Moving the pan slightly can help reveal a soft, aerated surface, but that observation works alongside the other signs of proofing rather than replacing them.
Start preheating during this final rise. This version uses 240°C with conventional top and bottom heat, provided the pan is rated for that temperature. Initially put the rack in the lower third of the oven. An additional stone or steel can supply heat from below, but is not essential. If you use one, both the pan and baking surface must be suitable for the combination, with their preheating instructions followed. A stone that has not heated through offers no dependable advantage over a well-chosen position on an ordinary oven rack.
Have the cheese and sauce ready
For the larger pan, begin with 200 g firm mozzarella and 150 g cheddar that melts well. Coarsely grate and mix them. This is an accessible alternative to the American brick cheese often used for the style. Fresh mozzarella in brine adds much more moisture and behaves differently. Drain it thoroughly if using it, and expect a softer surface. A particularly mature, dry cheese used alone will not produce the same melted layer across the dough. Choose the cheeses for the result you want rather than assuming all grated cheese works identically.
Prepare approximately 220 g of thick tomato sauce. You can gently simmer about 300 g of crushed tomatoes with a little salt and oregano until they reach the right consistency. The amount remaining depends on the tomatoes. A spoonful on a plate should hold as a dollop rather than immediately developing a watery border. Cool the sauce before topping the pizza. Sugar is not compulsory for this version; taste your tomatoes and decide whether they need any rather than automatically adding a set amount. The sauce should remain noticeable against the generous cheese layer.
Keep the first topping simple. Cheese and tomato stripes are enough to understand the dough thickness and your pan's browning behaviour. Later variations can include thin slices of ready-to-eat salami or precooked vegetables. Use additional ingredients sparingly. A tall layer of mushrooms, onions and fresh tomatoes changes the moisture load considerably. If you want to compare toppings, divide the surface mentally into two halves and alter just one of them. The difference is then easy to see when everyone shares the finished pizza, without losing a straightforward reference half.
Set the dough before building the cheese edge
For this domestic-oven method, bake the proofed dough without toppings for approximately eight to ten minutes first. It should become stable and look set on the surface while taking on little colour. Put the hot pan on a heatproof surface afterwards. Use dry, suitable oven gloves and prepare a clear place to put it down. The pan edges remain very hot while you add toppings. Have the cheese and sauce ready within reach so you do not need to open drawers or weigh ingredients while working around the hot tin.
Scatter cheese around the entire outside first, right where the dough meets the pan. Let it reach the side walls. Distribute the remaining cheese across the centre, then spoon the sauce over it in two or three stripes. Leave cheese visible between the stripes. You do not need a completely red surface or an additional layer of sauce directly on the soft centre of the dough. Arrange the stripes so each portion can receive some sauce when you cut the finished pizza, while leaving part of the cheese exposed to brown.
Return the topped pizza to the oven for approximately twelve to eighteen minutes. Watch the cheese edge as it becomes deep golden brown to brown and firm, without turning extensively black. Including the initial bake, allow roughly twenty to twenty-eight minutes as a starting range. Your pan may require a different time. If the top darkens early while the thick centre is still soft, reduce excessive direct top heat or shield the surface appropriately. A handsome cheese crust does not, by itself, prove that the dough underneath has finished baking.
Release the pizza and assess the base
After baking, carefully loosen the edge with a thin spatula suitable for the pan's surface. Tools must not damage the coating of a coated pan. Work all the way around before trying to lift the pizza out. A stuck corner can otherwise tear the base. Use two sufficiently wide tools where possible to lift the pizza onto a rack. Let steam escape for a few minutes. Leaving it in the hot pan for a long time holds moisture against the underside and reduces the crispness you have just created.
Inspect the centre when you make the first cut. The dough should be cooked through and light, without a wet, sticky dough layer. If the cheese edge is good but the bottom is very pale, adjust the heat from below or the initial baking phase next time. If the inside remains dense, also check the proofing before baking. More cheese around the sides cannot compensate for an insufficient rise or too much dough in the pan. Cut the finished pizza on a suitable board instead of directly inside a delicate coated tin.
Adjust the next batch from what you observed
Record the inside pan size, dough quantity and both baking times. Add the shelf position and whether you used a stone or steel underneath. These details are especially useful for pan pizza because changing the tin can affect the result more than a small variation in cheese. If the base was too thick, reduce the dough quantity next time using the area calculation. If the texture was right but the sauce dominated, use less sauce. There is no need to alter the entire recipe when one specific adjustment addresses the problem.
For guests, you can start by cutting the larger pan into eight rectangular pieces. Whether that is enough as a main course depends on appetites and side dishes. Plan around the total dough and topping quantities instead of treating the number of pieces as a fixed serving promise. Prepare salad or other cold dishes before the pizza enters its second baking phase. Then you can serve it directly after releasing it from the pan and letting steam escape briefly. Share the crisp corners fairly; they are a particular part of the pleasure of this style.