Choose an eggless formula deliberately
Eggless pasta dough is a dough in its own right. Water combines with the flour, and kneading develops a cohesive mass that can withstand shaping. You do not need liquid egg replacement or an additional binding ingredient. Fine durum flour works well for small hand-shaped pasta. However, converting an existing egg-pasta recipe is not simply a matter of omitting the eggs, because that removes liquid. Whole eggs also contain protein and fat as well as water. Replacing them with the same weight of plain water will therefore not automatically produce the same dough either.
Start with a formula designed around flour and water from the outset. You can then assess its firmness without changing several ingredients at once. For a vegan meal, the sauce and finishing ingredients matter too. Eggless pasta alone does not make a sauce containing cheese, butter or anchovies plant-based. With an egg allergy, the description eggless is also not a general assurance of safety. Check the actual ingredients and the utensils used against the person's requirements. The durum wheat dough described here contains gluten, even though it contains no eggs.
Begin with a small batch and a realistic schedule
For an initial batch, weigh 300 grams fine semola rimacinata and 155 grams water at room temperature. Keep some additional water separate in case your particular flour needs a small correction. This formula contains neither salt nor oil; salt goes into the cooking water later. You will have about 455 grams dough before handling losses. That is roughly three pasta-course portions or two larger portions, depending on sauce and side dishes. There is no need to roll the entire dough into one long rope at once.
Allow approximately 90 to 110 minutes before eating on your first attempt. About 30 minutes is a covered rest, during which you can prepare the sauce and work area. Mixing and kneading take roughly 15 minutes, with another 30 to 45 minutes for shaping small pieces, depending on experience. Heating water and final preparation can partly happen alongside other work. A small batch mainly reduces the shaping workload. Doubling the ingredients leaves the resting time similar but substantially increases the number of pieces you handle. The overall schedule therefore does not double according to a simple rule.
Set up the work area before mixing
You need scales, a wide bowl, a dough scraper or knife for dividing, and a clean work surface. An untreated wooden pasta board suitable for food use can be pleasant to work on, but an appropriate existing surface is sufficient to begin. It must sit securely and have no loose coating. Also prepare a board or tray on which the finished pieces can lie beside one another. Dust that resting surface lightly. A small spoon or bowl of extra semolina helps you apply flour deliberately instead of scattering large amounts over the whole area.
Have a cover for the dough ready too. A closely closed container or suitably sized inverted bowl keeps unused pieces from drying out. That matters particularly when you shape the first noodles slowly. Avoid cutting a large quantity and leaving it exposed while you work out the hand movement. Keep hands and utensils clean. Do not taste raw flour or uncooked dough. Later, assess doneness using cooked pasta after it has gone through the intended preparation, rather than biting into an unboiled piece to judge its texture.
Mix, knead and let the covered dough relax
Put the semolina in the bowl, make a well and pour in the measured water. Stir from the centre outwards with a fork, gradually incorporating more flour. Press the resulting crumbs together. Initially the mixture looks rough and relatively dry. Work it thoroughly before adding more water. If dry crumbs remain loose after careful mixing, add a few grams of water and distribute them fully. The dough should hold firmly together without turning into a sticky paste. Its exact behaviour also depends on how finely the flour has been milled.
Knead on the work surface for about eight to ten minutes until the mass looks smoother and more even. Press, fold and turn without constantly adding flour underneath. Shape a compact ball, cover closely and rest for 30 minutes. You are not waiting for fermentation bubbles or a doubling in volume. After the pause, a small portion should roll more readily. If it immediately pulls back strongly, give it a little longer under cover. A dry skin forming on the remaining dough instead indicates that the cover is not providing enough protection.
Shape cavatelli in small groups
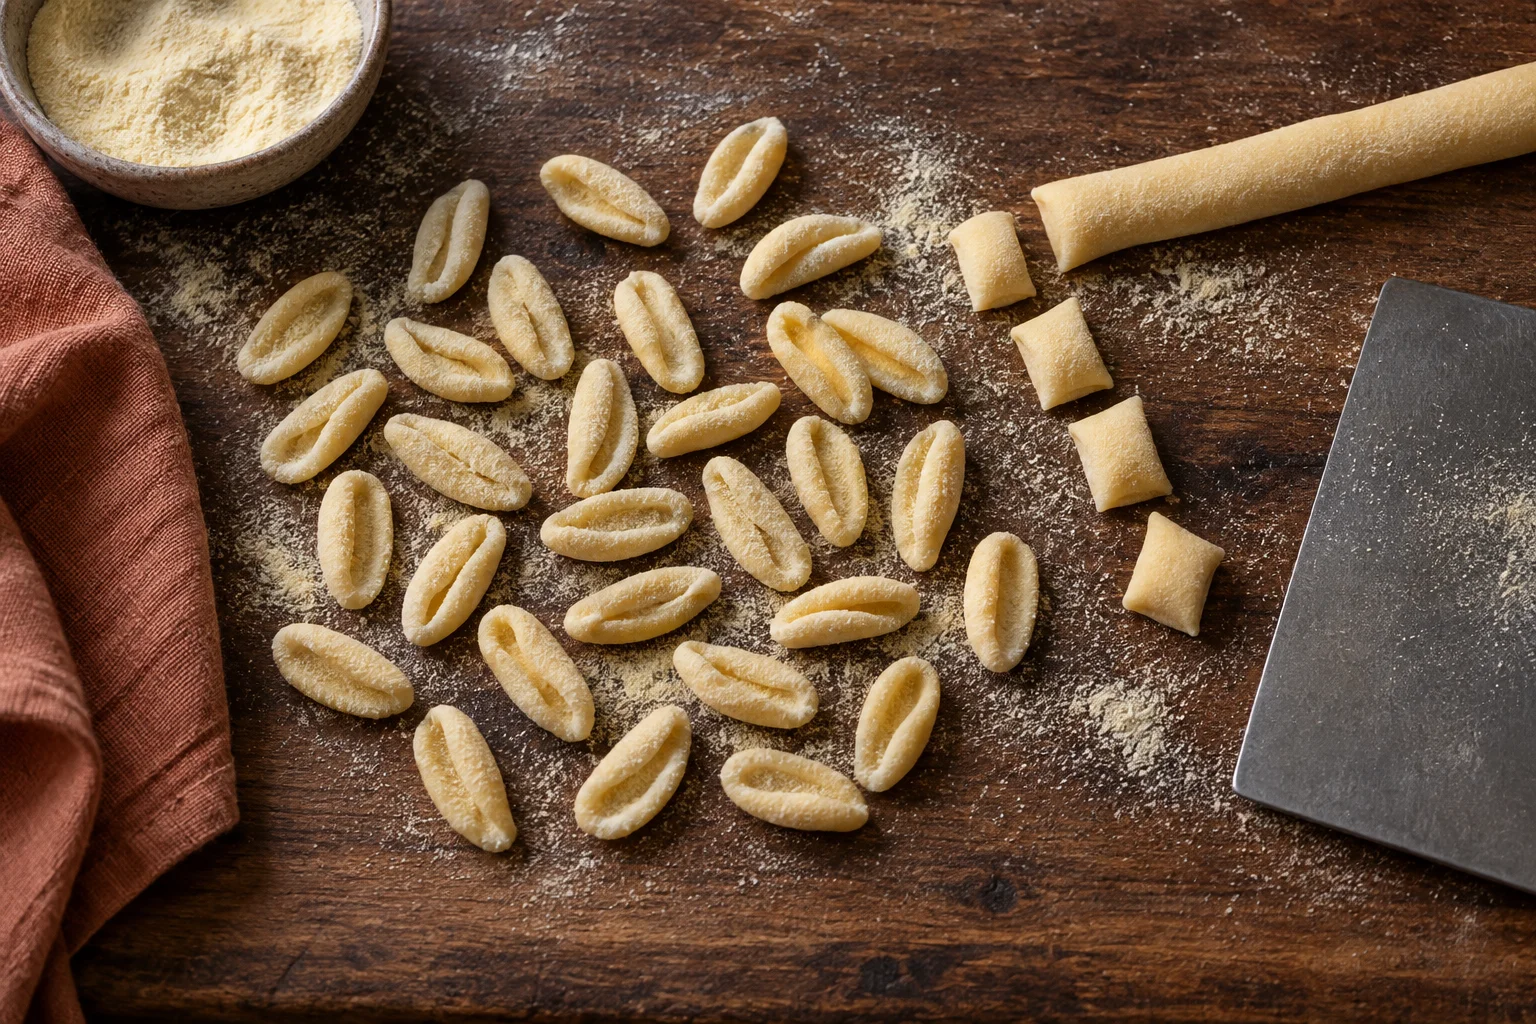
Divide the dough into four roughly equal pieces and cover three again. Roll the first piece into a rope about one centimetre thick. Divide it if it becomes awkwardly long. Cut only six to eight pieces at first, each roughly one centimetre long. This lets you work calmly on a small group while the remaining dough stays covered. Similar piece sizes are more useful for even cooking than weighing every individual noodle to an exact number of grams. There will still be natural small differences between pieces shaped by hand.
Place a fingertip on one piece, press it against the surface and drag it a short distance towards you. The dough lengthens and curls around the point of pressure. Aim for an elongated hollow with a thinner base. Simply pressing a hole into the top without dragging leaves a thick lump underneath. Release the noodle gently and place it hollow-side up on the prepared tray. Repeat until the first small group is finished, then cut the next pieces. This keeps your attention on the movement without letting a large pile of cut dough dry out.
Adjust pressure and dusting as you work
If the dough slides over the board without opening, there may be too much loose flour underneath or too little pressure. Push excess flour aside and try the movement with one piece. If it sticks firmly and tears when lifted, a little additional dusting may help instead. Change one point at a time. You need enough grip to pull the dough open, but not so much that you must force the noodle off the board. A small group makes the effect of your hand movement clearer than a whole tray of irregular pieces.
If you press through the bottom, the movement was too forceful or the piece too thin. Reshape it while the dough is still soft and has not dried out completely. A slightly uneven rim is fine. What matters is avoiding some solid thick lumps alongside other paper-thin pieces. Set the finished noodles apart and avoid piling them in heavy layers. With more than one tray, you can keep groups separate. During cooking, this makes it easier to notice whether a noticeably larger group needs a little longer in the water.
Hand-rolled strands offer another option
If hollowing pieces feels awkward, roll a small portion into thin strands instead. Take a little dough and move your outstretched fingers from the centre towards the ends. Aim for an even strand about three millimetres thick. Its length follows from the amount of dough and the space available. Do not merely pull the ends apart, because that produces thin weak points. A lightly gripping surface helps with this shape as well. Too much loose flour makes the strand slide under your hands without becoming longer.
Lay the strands loosely beside one another or in wide curves on the dusted tray. Tight nests pressed together may stick. This hand-rolled shape resembles pici, which are made with various flour and dough formulas. Use the described mixture for shaping practice and keep the strands similar in thickness. Avoid putting very thin long strands and much thicker cavatelli into the same cooking batch without planning for different times. For a first shared plate, one consistent shape is easier to cook evenly and combine with its sauce.
Prepare the sauce during the rest
A prepared tomato sauce works with the small hollows in cavatelli. Chunky lentil or vegetable sauces also suit them, provided the pieces are not much larger than the noodles. Have the sauce ready in a sufficiently large frying pan so that you can fold in the cooked pasta without crowding it. For a vegan meal, check the ingredients in bought sauces, pesto and any cheese alternatives as well. This dough does not require a special vegan replacement product; a straightforward sauce of tomatoes, olive oil and herbs is enough.
Plan the final saucing step before boiling the pasta. A hot tomato sauce can finish briefly with the noodles. A cold pesto is mixed in after they are fully cooked and does not need frying. Set out a cup for reserving cooking water. That liquid helps loosen a sauce that is too thick. Begin with a small amount later and add only enough to let the sauce cling to the pasta. The hand-shaped pieces should keep their hollows rather than disappear under a large volume of liquid added at the last moment.
Check the thickest part for doneness
Bring a sufficiently large saucepan of salted water to the boil. Add the shaped pasta and stir gently at the beginning so that the pieces do not settle together on the bottom. Small fresh cavatelli often take around three to five minutes; thicker pieces or those that have dried longer may need more time. Lift one out, allow it to cool slightly and check its thickest point. It should be cooked through and pleasantly resilient, without a hard or floury raw core. Floating to the surface does not replace that assessment. Thin and thick shapes do not develop the same bite in the water.
Transfer the pasta into its prepared sauce using a suitable strainer or slotted spoon, keeping some cooking water aside. For a brief hot finish, take it out of the saucepan slightly earlier so it can complete cooking in the frying pan. For a cold sauce, cook it fully beforehand. Combine gently and divide straight onto plates. Fresh pasta should be pleasant to eat; it does not need to imitate the firm centre of industrially dried pasta. A little resilience is different from a layer of flour that has not cooked through.
Plan unused pasta and a later meal
To save some uncooked noodles, freeze the pieces separately on a suitable tray first. Once firm, put them into appropriate packaging in portions and label with the shape and date. Cook them directly from frozen in boiling water and check the bite again. A fixed number of extra minutes cannot be promised for every size. Prolonged surface drying on the kitchen table does not automatically turn this dough into shelf-stable food. Cupboard storage is not part of the method described here, even when the outside of the noodles feels dry.
For your next batch, note the flour product, water weight and intended shape. If the dough rolled well but the cavatelli were too thick inside, adjust the shaping movement first. If it was crumbly before shaping, review the mixing, rest and a possible small water correction. More water does not solve every difficulty, and a longer boil is no substitute for reasonably even wall thickness. A small, consistently shaped batch makes preparation easier to schedule, so you can cook the pasta when the sauce and table are ready.