Dough and filling for a first batch
Homemade ravioli mainly need dough that rolls thinly and a filling that stays where you place it. A rolling pin and knife are enough to begin. A pasta machine can make rolling easier, but a special ravioli stamp is unnecessary. Start with a small series of equally sized pieces. You can then see whether dough thickness, filling quantity and the border work together before processing the rest of the dough.
Our fresh pasta recipe uses 300 grams of flour and three medium eggs as a suitable starting dough. Depending on the flour and egg weight, it may need a few drops of water to come together. Knead for around eight to ten minutes and rest well covered for at least 30 minutes. It should be smooth and workable without smearing onto your hands. Resting is part of preparation. Resistant, freshly kneaded dough is much harder to roll evenly and thinly.
For a simple filling, combine 250 grams of well-drained ricotta, 75 grams of cooked, squeezed and finely chopped spinach, and 25 grams of finely grated hard cheese. Season lightly with salt, pepper and a little nutmeg. The spinach quantity specifically means its weight after cooking and squeezing. This filling contains no additional raw egg. Begin with about a small teaspoon per raviolo and adjust to your shape. The actual number of pieces depends on size, dough thickness and offcuts.
Check filling moisture and texture
Ricotta varies in how much liquid it contains. Drain visible whey before mixing the filling. Squeeze cooked spinach thoroughly and chop it finely. Long fibres can hang over the dough border and interfere with a clean seal. The finished mixture should remain in a small mound. If liquid collects around it, address that before filling. Adding a larger quantity does not compensate for a mixture that is too wet.
Keep the filling refrigerated until needed and take out only a manageable working quantity. Hot ingredients do not belong on a thin pasta sheet. When trying different fillings later, follow a complete method appropriate to them. Raw meat fillings have different cooking requirements from this mixture of ricotta and already cooked spinach. Mushroom ragù must also be sufficiently dry and cooled. Assess each new filling for moisture, fine texture and the cooking time it needs.
Prepare the work surface
Set out the dough, chilled filling, a small bowl of water, a knife or pastry wheel and a prepared tray. Lightly dust the tray with flour or fine semolina to prevent the finished pieces sticking. You also need room for a rolled sheet. Clear that space before making the dough thin. A lengthy search for a board allows the surface to dry. The borders then seal poorly and may require more water than they otherwise would.
Divide the dough into several manageable pieces and tightly cover those you are not using. Roll only as much as you can promptly fill. For a first attempt, a short sheet holding three or four ravioli is easier to manage than a strip across the whole worktop. Keep dried filling off your hands. Small traces of fat or cheese on the contact areas can prevent the two dough layers from adhering cleanly.
Roll thinly and evenly
With a pasta machine, move gradually from a wider setting to thinner sheets. Do not skip several settings if the dough bunches up or tears. Numbers on different machines are not directly comparable, so judge the sheet itself. Around one millimetre or slightly less is a useful initial target here. Very thin dough requires greater care, while thick dough takes longer to cook, especially at the doubled seam.
With a rolling pin, work from the centre outwards and turn the sheet regularly. Check the edges, which can otherwise remain thicker. If the dough springs back strongly, cover it briefly and allow around ten minutes of relaxation. Use little dusting flour. It should prevent sticking without forming a dry layer on the future seams. An even sheet is more useful initially than a particularly large one with a thin centre and edges still several millimetres thick.
Leave room around each filling mound
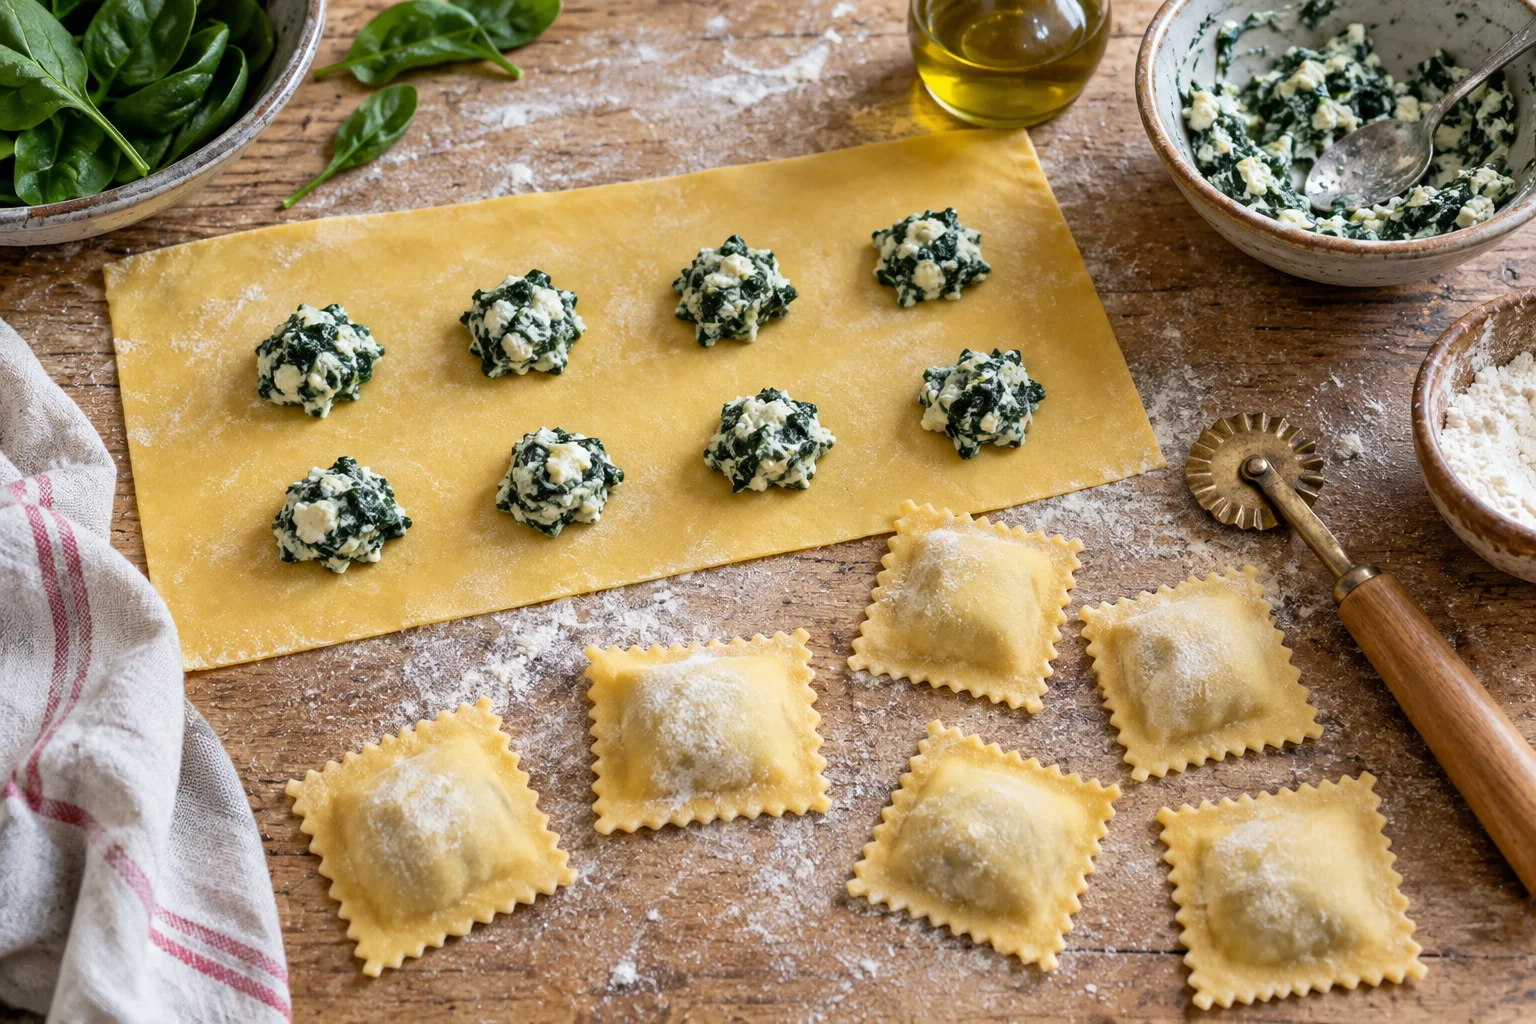
For square ravioli, initially aim for pieces roughly six to seven centimetres across. Place small filling portions along the lower half of a wider sheet or on a separate bottom sheet. A small teaspoon is a useful starting amount. Leave enough bare dough around each mound to retain about a centimetre of sealing border after cutting. If the filling squeezes into that border during pressing, the portion was too large.
Make two or three pieces first and inspect their proportions. The upper dough must drape over the filling without being stretched tightly. A taut raviolo can look neat initially but may tear more easily during cooking. Leave adequate dough between portions. A slightly smaller filling quantity makes sealing easier to learn. Once the movement is familiar, adjust the size deliberately without changing dough thickness and shape at the same time.
Remove air and seal the edges
Lay the upper sheet gently over the filling or fold the free half across. Begin pressing beside the filling and work outwards. This pushes trapped air towards the border before the seam closes completely. Smooth the dough without pressing on the filling mound. Do not simply seal visible air bubbles inside. Before final closure, a small pocket can often be eased towards an open edge.
If the contact areas have dried, moisten them very lightly with water. A damp finger or small brush is enough. The surface should become slightly tacky rather than visibly wet or soggy. Press the seam carefully together, then cut between portions with a knife or pastry wheel. Check every border individually. A stamp can combine cutting and pressing, but it does not replace inspection. A decorative fluted edge cannot fix filling caught in a seam or air trapped inside.
Cook one raviolo as a check
Before finishing the entire batch, cook one piece to assess dough thickness and the filling ratio. Bring enough salted water to the boil, then reduce it to a gentle boil after adding the raviolo. It should have room to move without being thrown against the pot. For freshly shaped pieces of this size, initially allow about five to eight minutes and begin checking around five minutes. Very thin, small pieces may be ready sooner; thicker seams need longer.
Cut open the cooked sample. The dough should be pleasantly cooked at the seam as well as the centre, and the filling must be thoroughly hot. A useful thorough-heating target is at least 70 °C for two minutes in every part; use a clean food thermometer if uncertain. Floating to the surface alone is not an adequate doneness test. Taste only the fully cooked piece. Raw flour and raw egg dough should not be tasted. Adjust dough thickness or filling quantity for the remaining batch if necessary.
Cook the rest gently
Cook ravioli in manageable batches so they have room and the water temperature does not fall too sharply. Carefully release any sticking pieces without crushing them with a spoon. If one opens, remove it and inspect the seams of those still uncooked. More vigorous boiling does not reliably speed the process and can damage the thin pockets. Watch the pot and use your cooked sample as a guide.
Lift finished ravioli with a slotted spoon and allow them to drain briefly. This is gentler than tipping the entire pot forcefully into a colander. Transfer them to a broad bowl or suitable pan containing prepared sauce. Turn gently. A restrained coating, such as a little butter or light tomato sauce, suits the spinach and ricotta filling. The sauce should complement the filling and keep the pasta moist without burying it under a heavy layer.
Prepare ahead and freeze
If you are not cooking immediately, arrange ravioli separately on the prepared tray and refrigerate covered. Plan fresh filled pasta for the same day, with only a short refrigerated wait of a few hours. Avoid letting the filling soak the thin underside for a long time. Do not leave the pieces on the worktop to dry overnight. For longer preparation, freezing portions is the more suitable method. Check first that your freezer has room for a flat tray.
Once the pieces have frozen separately, transfer them to a suitable sealed container or bag. Label with the date and filling and plan to use them over the next two weeks. Store at around minus 18 °C. Put frozen ravioli straight into the cooking water, as damp pockets can stick together during thawing. Allow extra cooking time and check both dough and filling again. The timing for a freshly made sample cannot be transferred unchanged to frozen ravioli.
Common problems and the next batch
If seams open, first check for filling on the contact surfaces, excess dusting flour or too narrow a border. If the dough tears over the filling, it may be too thin or stretched too tightly. If seams remain tough, roll more evenly and avoid excessively wide, thick edges. Pieces sticking to the tray suggest moisture, insufficient dusting or too long a wait. Do not pull them off forcefully. Work in smaller series next time.
Gather clean dough offcuts without filling, rest them briefly and roll again. Additional dusting flour makes them drier with each pass, so do not keep reworking them indefinitely. Instead, cut irregular leftovers into simple soup noodles or ribbons and cook them fully. Note the dough thickness, approximate piece size and suitable cooking time for your next ravioli batch. Once those basics work, try a different filling. Change one thing initially so you can judge its effect.