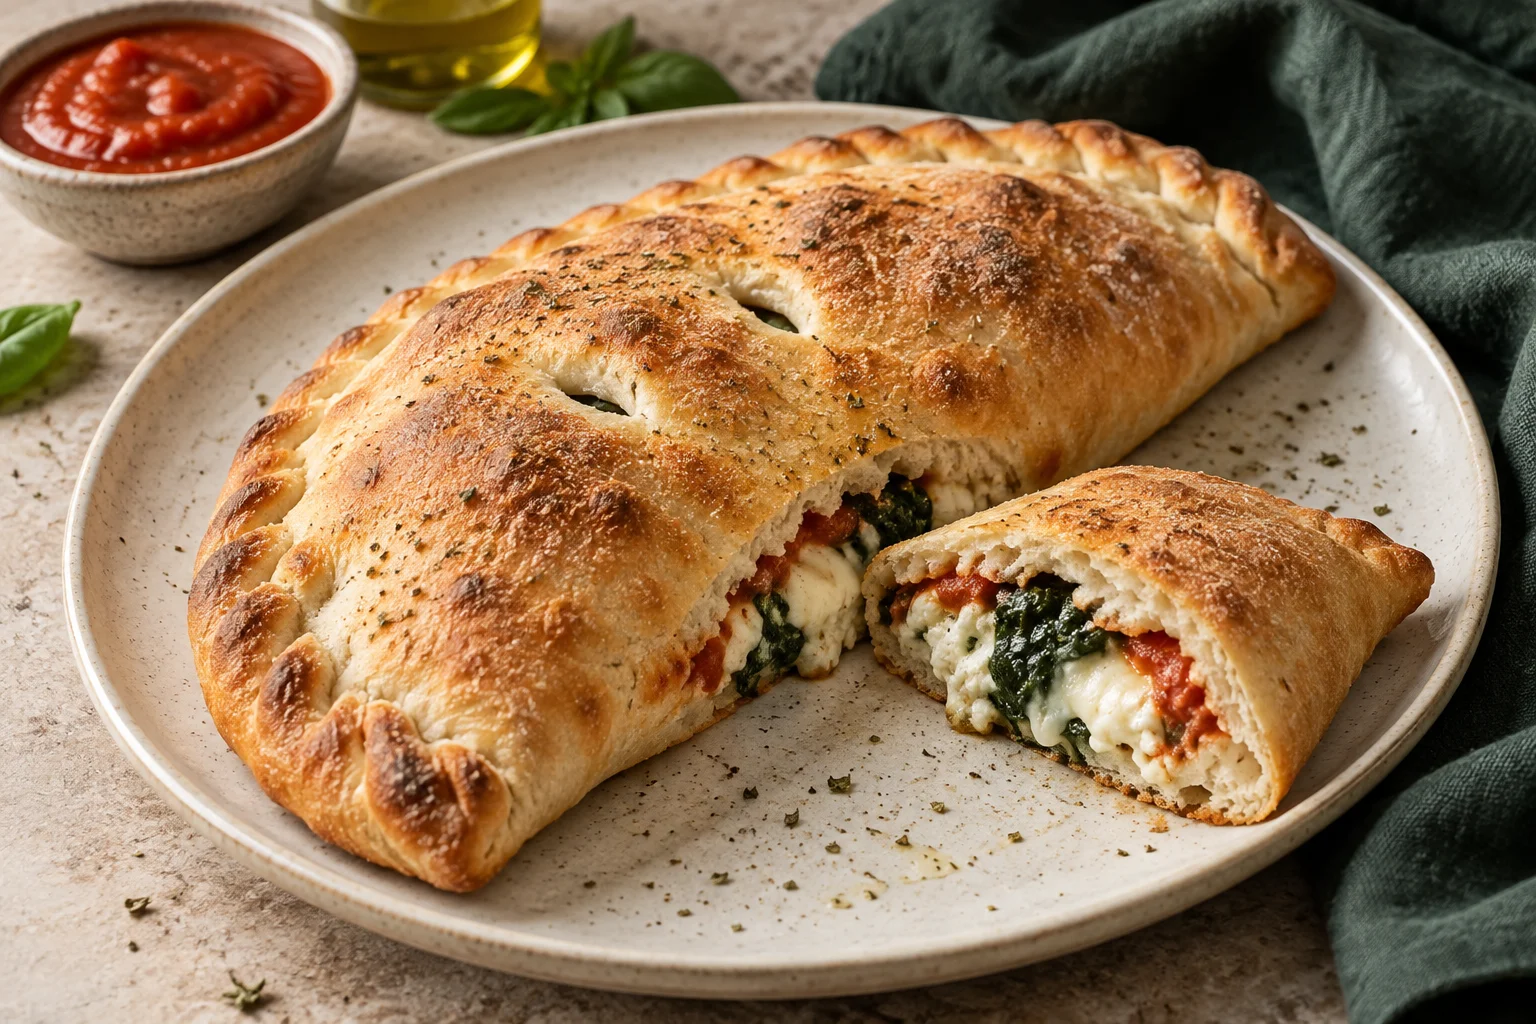
Plan the dough and filling separately
On an open pizza, you can see the toppings throughout baking. Inside a calzone, they sit between two layers of dough. Moisture escapes more slowly, and heat also has to reach the dough surfaces facing the filling. A heavy, wet mound is therefore harder to bake evenly than a thin topping on an open base. Keeping the ingredients enclosed is part of the appeal: they stay protected and moist. Prepare them so that you retain this benefit without trapping unnecessary liquid. Making the dough shell thicker is usually less useful than controlling that liquid first.
Plan dough fermentation independently of the filling. Make a suitable pizza dough or use an appropriate prepared dough, following its instructions. A dough with an overnight refrigerated rise needs to start the day before. The baking minutes below do not include that fermentation. With two fully proofed dough balls and prepared ingredients, the final assembly is straightforward to organise. If you still need to cook spinach or reduce a sauce, allow time for that preparation and for cooling. A cool filling is easier to handle than ingredients that are still steaming while you fold the dough around them.
Remove excess water from cheese and vegetables
Ricotta gives the filling a creamy consistency. If liquid has collected in its container, let it drain in a fine sieve before weighing it. It should remain spreadable rather than becoming dry and crumbly. Cut mozzarella into small pieces; fresh mozzarella packed in liquid needs thorough draining. A firmer mozzarella intended for pizza is easier to portion for this purpose. Either can work, but its moisture has to fit the rest of the filling. A dry surface on a piece of fresh mozzarella does not mean that it will release no further liquid when heated.
Cook spinach first, let it cool and squeeze out excess water. Then chop it so that long leaves do not pull the filling out when you cut a portion. Mushrooms also need cooking that allows their released water to evaporate. Peppers should already have the softness you want to eat. A short calzone bake is not a reliable substitute for cooking raw pieces of meat through. Use cooked meat or suitable ingredients ready to eat. When making substitutions, consider water, fat and salt as well as weight; equal quantities can behave quite differently inside the same dough shell.
A filling example for two calzones
For two substantial calzones, prepare two fully proofed dough balls weighing 250 grams each, 100 grams drained ricotta, 100 grams firmer mozzarella, 60 grams cooked and squeezed spinach, and 40 grams thick, cooled tomato sauce. You also need two teaspoons olive oil for brushing, pepper and salt as needed. A small pinch of nutmeg suits the spinach but is optional. The 60 grams spinach is its weight after cooking and squeezing. The amount of fresh spinach needed to produce it varies with the leaves and how much water you remove.
Each calzone therefore contains 50 grams ricotta, 50 grams mozzarella, 30 grams spinach and 20 grams sauce: 150 grams filling in total. Together with the dough, an unbaked portion weighs about 400 grams before the thin oil coating and seasoning. This is a suggested combination for a manageable starting point, without claiming a universal traditional formula. Season the ricotta and spinach before assembly, taking the cheese into account. For a stronger tomato flavour, serve extra warm sauce alongside. That gives you more sauce at the table without adding increasing amounts of liquid inside the closed pocket.
Shape an even circle of dough
On a lightly floured work surface, shape each dough ball into a circle roughly 26 to 28 centimetres across. The exact size depends on how relaxed and extensible your dough is. Aim for a few millimetres of thickness without transparent patches or tears. You do not need the particularly thick, inflated rim of some open pizza styles: two similar edges need to meet and seal. Work with your hands or use a rolling pin. Apply pressure evenly instead of repeatedly pressing only the centre, which can leave a weak patch directly beneath the filling.
If the dough immediately springs back, cover it and give it ten to fifteen minutes to relax. This is a shaping pause for mature dough, not a replacement for missing fermentation. Try again after the pause instead of rolling increasingly hard. Avoid covering the surface with large quantities of flour, since dry flour between the edges makes sealing difficult. Turn the circle occasionally and check that it still lifts away from the worktop. It does not need perfect geometry. An intact centre and a clean, reasonably wide sealing edge matter more than an exact circular outline.
Fill one half and seal the edge
Place the filling on one half of the circle, leaving about two centimetres clear around the curved outer edge. Spread it as a low mound rather than a tall heap. You can mix the ricotta with the chopped spinach and distribute the small mozzarella pieces through it. Add the measured sauce sparingly. Keep oil and sauce away from the empty border. If filling reaches the edge, pressing harder later will not necessarily create a reliable seal. Remove a spoonful before closing instead. Any spare prepared filling can be served separately as part of the meal.
Fold the empty half gently over the filling without pulling or tearing it. Ease large trapped air pockets towards the still open edge. Brush excess flour off the contact surfaces. If they have become very dry, lightly dampen one edge with water. Press the two layers together along the entire curve, fold the outermost edge over once in a narrow fold and press again. A fork can help with the final pressure, but its tips must not puncture the shell. A thick edge rolled over several times is harder to cook through than a narrow, firmly joined seam.
Prepare the tray and household oven
For this example, preheat the oven to 220°C conventional top and bottom heat. Use a suitable metal baking tray, lightly greased or lined with baking paper rated for that temperature. A tray makes the filled dough easier to handle than transferring it loose from a pizza peel. You do not need a pizza stone for this method. If you choose a stone or steel instead, you change how heat reaches the base. Follow its instructions and expect different browning underneath. The tray timings should not automatically be transferred to that setup.
Place the sealed calzones apart on the prepared tray. Brush each lightly with one teaspoon oil. For this oven version, make one or two short slits in the top dough layer to let steam escape. Cut through the top only, away from the sealed edge and without cutting the base. This is not an instruction for fried pizza pockets, where openings could let oil in and filling out. Start with the tray in the lower to middle part of the oven so that the bottom receives enough heat as the shell bakes.
Check the dough as well as the colour
For the sizes described, approximately 20 to 25 minutes is a starting range. Begin checking at about 18 minutes and adjust to your oven. The shell should be golden, with a firm, baked base. A very dark top over a pale underside suggests an uneven heat balance or a tray placed too high. On another batch, move it lower if your oven allows. Switching on the grill is not an automatic solution: it mainly adds colour to the top and does not resolve raw dough underneath a wet filling.
At the first cut, inspect the dough directly beneath the filling and the joined edge. Neither should retain a raw, sticky dough band. Melted cheese can also look glossy, but it sits between the dough layers. If the dough is still underbaked, return the calzone to the oven. An evenly golden exterior or a hot strand of cheese is not sufficient evidence by itself. A much thicker or heavier pocket cannot simply use the same timing. Keep portions similar and reduce the height of the filling if necessary so that heat can reach the centre more readily.
Rest briefly before cutting and serving
Let the baked calzones rest on a suitable surface for about five to ten minutes. The filling remains hot but is less likely to spread uncontrollably as you cut. Use a sharp knife or suitable pizza cutter without first flattening the pocket. Ricotta and melted mozzarella can still be very hot when the outside edge feels comfortable to touch. For children, opened pieces that have cooled a little are easier to assess than a closed parcel. Put extra sauce in a separate small bowl so that the crust does not sit in it and soften.
A small salad or prepared vegetable side works alongside the substantial portions in this example. For several different fillings, use distinct small dough marks on top or record a clear order on the tray. You can then identify them without opening each pocket. Check dietary requirements against the ingredients actually used. A cheese calzone is not automatically vegetarian if its cheese contains animal rennet. With vegan fillings, also follow the instructions for the particular plant-based products. Their melting and moisture behaviour can differ from dairy cheese, which affects how the filling works inside the shell.
Make substitutions with moisture in mind
For a mushroom version, replace the prepared spinach with chopped mushrooms that have been cooked until most released liquid evaporates, then cooled. Weigh them after that preparation. For a ham version, use chopped cooked ham and begin with less added salt. Preserved artichokes or peppers also need draining. Keep the total filling weight close to the example for an initial batch instead of adding each new ingredient on top. This maintains a similar thickness and lets the upper dough fold over without stretching tightly across a much larger mound.
A very soft cream may need less additional sauce. A large amount of fresh mozzarella may release more water than firmer pizza mozzarella. Substitutions therefore change baking behaviour as well as flavour. If an ingredient is unfamiliar, prepare a smaller portion of filling and examine its consistency in the bowl. It should be spoonable without immediately leaving a pool around it. A thick coating of tomato sauce on the outside is also different from the light oil brushing used here. It browns differently and may darken sooner, so it is not a direct replacement within the same method.
Prepare ahead and diagnose specific problems
For guests, prepare dough balls according to their recipe and keep sauce and cooked vegetables separate. Cool cooked ingredients promptly if they will not be used straight away, then store them appropriately refrigerated. Keep cheese chilled until needed for preparation too. Fill the calzones close to baking time. Hours of waiting with a moist filling can soften the dough and make moving it harder. With several trays, a planned sequence is often easier to manage than suddenly filling the entire oven. Keep track of which portions go in and come out first.
If a seam opens, check for clean contact surfaces, reduce the filling and press the edge evenly. If the top tears, look for a thin patch or too much tension over the mound. A wet base calls for attention to draining, filling depth and heat underneath. These are different problems; adding more flour to the entire dough does not automatically solve them. Change the specific point that explains what happened. A carefully sealed, moderately filled calzone is easier to bake evenly and easier to divide cleanly at the table.