What a poolish changes in pizza dough
A poolish is a loose yeast preferment made with equal weights of flour and water. It lets part of your pizza flour start fermenting the evening before you mix the final dough. The remaining ingredients go in the following day. This divides preparation into two manageable stages and gives the first portion of flour time to develop flavour. You do not need an established sourdough starter. Each batch begins with commercial yeast and goes into the final dough in its entirety. Occasional pizza makers can therefore explore preferments without maintaining a culture between baking days.
The quantities below make three pizzas with just under 280 g of dough each. The schedule combines an overnight poolish with a warm rise on the day of baking. Final dough hydration is 65 percent. That is different from the poolish's 100 percent hydration: equal weights of flour and water apply only to the preferment. The extra flour in the final mix makes the complete dough considerably firmer. A loose, bubbling preferment can therefore become a pizza base that, with a little practice, is quite manageable on a peel.
Divide the ingredients between the two stages
For the poolish, weigh 200 g wheat pizza flour, 200 g water and 0.2 g instant dried yeast. The final mix needs another 300 g of the same flour, 125 g water, 12.5 g salt and 0.8 g instant dried yeast. Altogether, that gives you 500 g flour, 325 g water, 12.5 g salt and 1 g yeast. Total dough weight is 838.5 g. Divided into three equal portions, each would weigh 279.5 g, although a small amount left on the bowl or utensils will reduce the actual yield slightly.
Choose flour that its manufacturer recommends for pizza and longer fermentation. A flour's type number does not describe all the properties relevant to this process. For a first attempt, familiar flour is more useful than changing flour, preferment method and water content at the same time. This version contains no oil or sugar, which keeps the formula straightforward. If you later want to develop a softer or more strongly browned home-oven version, change one ingredient deliberately and record its weight instead of adding several extras by eye while mixing.
Measure small yeast quantities properly
The poolish needs just 0.2 g yeast, less than many ordinary kitchen scales can measure reliably. Use a suitable precision scale that genuinely handles small quantities. A decimal place on the display is not, by itself, evidence of accuracy. A teaspoon or a generous pinch would change this formula substantially. Dividing a seven-gram sachet into estimated little piles is also an imprecise way to obtain such a small fraction. Before starting, check that your available equipment can measure both yeast quantities rather than discovering the problem with the other ingredients already in the bowl.
Use the instant dried yeast specified in this schedule. Fresh yeast and other dried yeast products may need different quantities or preparation. If you change products, follow the manufacturer's conversion guidance and recalculate both dough stages. The additional yeast in the final mix is intentional. It is not a mistake or an indication that the poolish has failed. Leaving it out produces a different fermentation schedule, and the warm rising times below cannot simply be assumed to apply to that altered dough.
Mix the preferment the evening before
Stir the flour, yeast and water together in a clean container until no dry pockets remain. A brief mix with a spoon is enough; there is no need to knead a smooth ball. Choose a container with plenty of room for expansion. If it has straight sides, mark the starting level on the outside. Cover the mixture to prevent its surface drying out, then leave it somewhere with a reasonably steady temperature. A windowsill that catches the morning sun is less predictable than a sheltered spot elsewhere in the room.
At around 20°C, allow an initial planning window of twelve to sixteen hours. This is an estimate for the small yeast quantity, not a guaranteed finishing time. A substantially warmer room speeds fermentation, and the poolish might reach its useful stage before breakfast. In a cool kitchen, it may need longer. Measure the temperature instead of assuming that a July schedule will behave identically in January. Refrigeration is not an equivalent substitute for this overnight room-temperature stage; a cold preferment would need a separately adjusted process.
Recognise when the poolish is ready
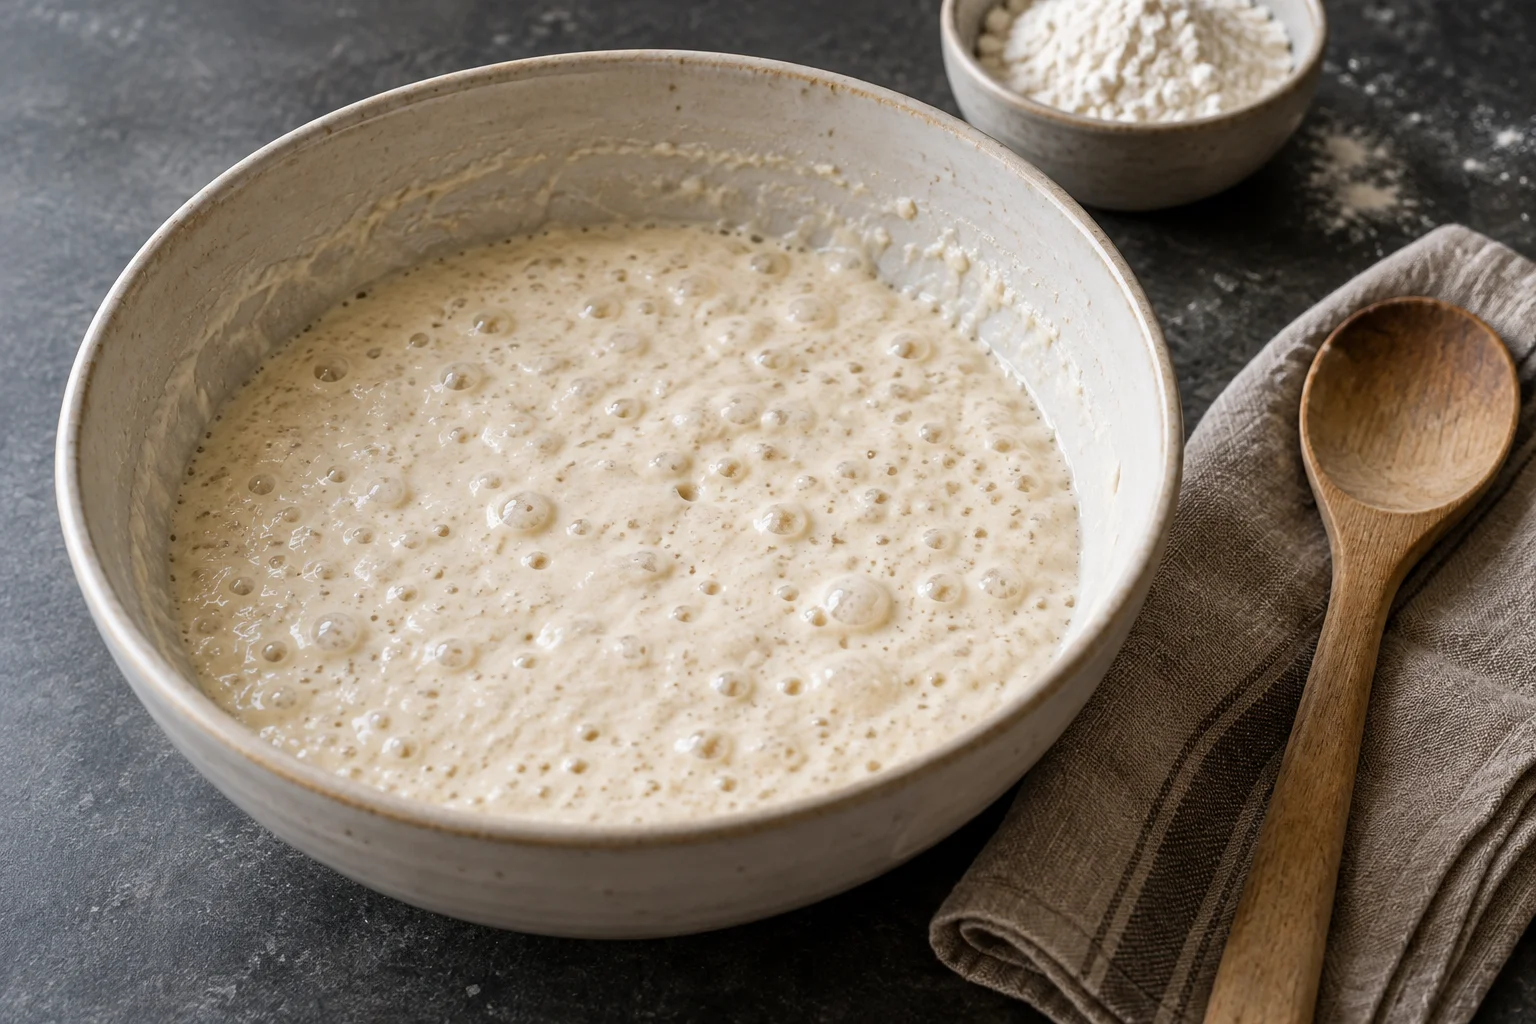
A ripe poolish looks aerated and has numerous bubbles across its surface. It has visibly changed from the freshly mixed batter and, towards the end of its rise, begins to sink slightly in the centre. Look at several signs together. One large air pocket does not prove that the whole preferment is ready. Aim to use it when it is active and its surface has just reached its highest point or is beginning to recede. A pleasant fermented aroma is part of the picture; tasting the raw mixture is unnecessary.
If the mixture remains dense and almost unchanged after the planned interval, check the temperature and yeast you used, then allow more time. If it has already collapsed extensively and become very runny, do not build a tightly timed meal for guests around it. Adding flour cannot return an overripe preferment to an earlier stage of development. For the next attempt, choose a cooler position or a later starting time. Visible mould means the mixture should be discarded; it is not an ordinary sign of maturity in a pizza preferment.
Mix the final dough and watch it develop
Put the ripe poolish into a larger bowl with the remaining 125 g water and stir together. Combine the additional 300 g flour with the 0.8 g instant yeast, then work this into the mixture. Add the salt and knead until the dough becomes cohesive and more even. A short covered rest can make further kneading easier. Do not immediately add more flour because the mixture feels sticky at first. Keep to the measured water balance, and use a scraper to collect dough from your hands and the work surface.
Let the mixed dough rise, covered, for roughly two hours at about 23°C. After half an hour, you can gently fold it towards the centre from several sides if it still lacks strength. During this stage it should become lighter and show a noticeable increase in volume. Treat two hours as a first assessment point. Dough that remains dense and firm needs longer. If it is already well aerated and spreading softly, move on to dividing it sooner. The clock supports your observations; it cannot replace them.
Divide the dough into three portions and round each into a smooth ball. Use little extra flour and close the seam underneath. Put the balls into suitable covered containers with space around them. Allow approximately another one to two hours at a similar room temperature. The portions should relax, become visibly lighter and eventually open without repeatedly springing back. A tight ball that has just been rounded is usually too resistant. Very soft balls, on the other hand, should not be left waiting merely because the recipe's estimated time has not yet elapsed.
Turn the method into a practical baking schedule
For pizza early on Saturday afternoon, you might mix the poolish at around 9 pm on Friday. Your first assessment window would then fall between roughly 9 am and 1 pm on Saturday. If it is ready at 10 am, for example, start the final dough then. After its warm bulk rise, divide it around noon and begin assessing the balls from 1 pm. Their actual condition determines when you bake. This example deliberately provides a window rather than a minute-by-minute promise, because temperature and yeast activity vary between kitchens.
For dinner at 7 pm, that particular start may be too early. You could begin the poolish later, or plan a deliberate refrigerated stage for another bake. Do not simply add six unplanned warm hours to dough that is already ready. Before starting, write down when you will be at home, when the oven needs preheating and how many pizzas will bake in succession. The final ball waits longer than the first. With larger batches, staggering preparation is more useful than hoping that every portion will remain unchanged after reaching maturity.
Shape and bake in a domestic oven
For a dough ball weighing just under 280 g, start with a diameter of about 30 cm. Press the centre flatter while leaving a narrow rim. Stretch gradually without pulling hard on one thin area. If the base keeps contracting, cover it briefly and allow more relaxation. Stop enlarging it if the centre becomes translucent. A slightly smaller, evenly shaped base is easier to top and move than a wide disc that already threatens to tear on the peel. Keep your first pizza modest so that you can judge the dough without fighting its size.
Preheat a suitable baking surface according to its manufacturer's instructions. At around 250°C with conventional top and bottom heat, estimate eight to twelve minutes for the first pizza, checking from minute six. Use a light topping, such as 70 g crushed tomatoes and 70 g well-drained mozzarella. Assess the base, rim and cheese together. Browning on top does not prove that the centre has baked through. A dedicated pizza oven needs different settings and much shorter baking times; do not transfer the domestic-oven timing unchanged to its higher temperature.
Change the prefermented flour percentage deliberately
In this formula, 200 g of the total 500 g flour goes into the poolish. That means 40 percent of the flour is prefermented. The roughly 400 g of finished poolish is not, however, 40 percent of the complete dough's weight. Those are different measurements and are easily confused. If you later use only 100 g flour in the poolish, it also needs only 100 g water. To retain 500 g total flour and 325 g total water, the final mix would then need 400 g flour and 225 g water. Yeast and fermentation timing require separate adjustment.
To make six pizzas of the same size without changing the formula, double every ingredient weight in the original schedule instead. Fermentation times do not double with the batch. Use containers large enough for the dough and remember that a larger mass holds its temperature differently. Record your flour, room temperature, poolish maturity and the condition of the dough during shaping. Those notes let you judge whether a change actually helped. Begin with one adjustment, perhaps starting the preferment later in the evening, before changing hydration, yeast type and preferment percentage together.