Start with a manageable batch
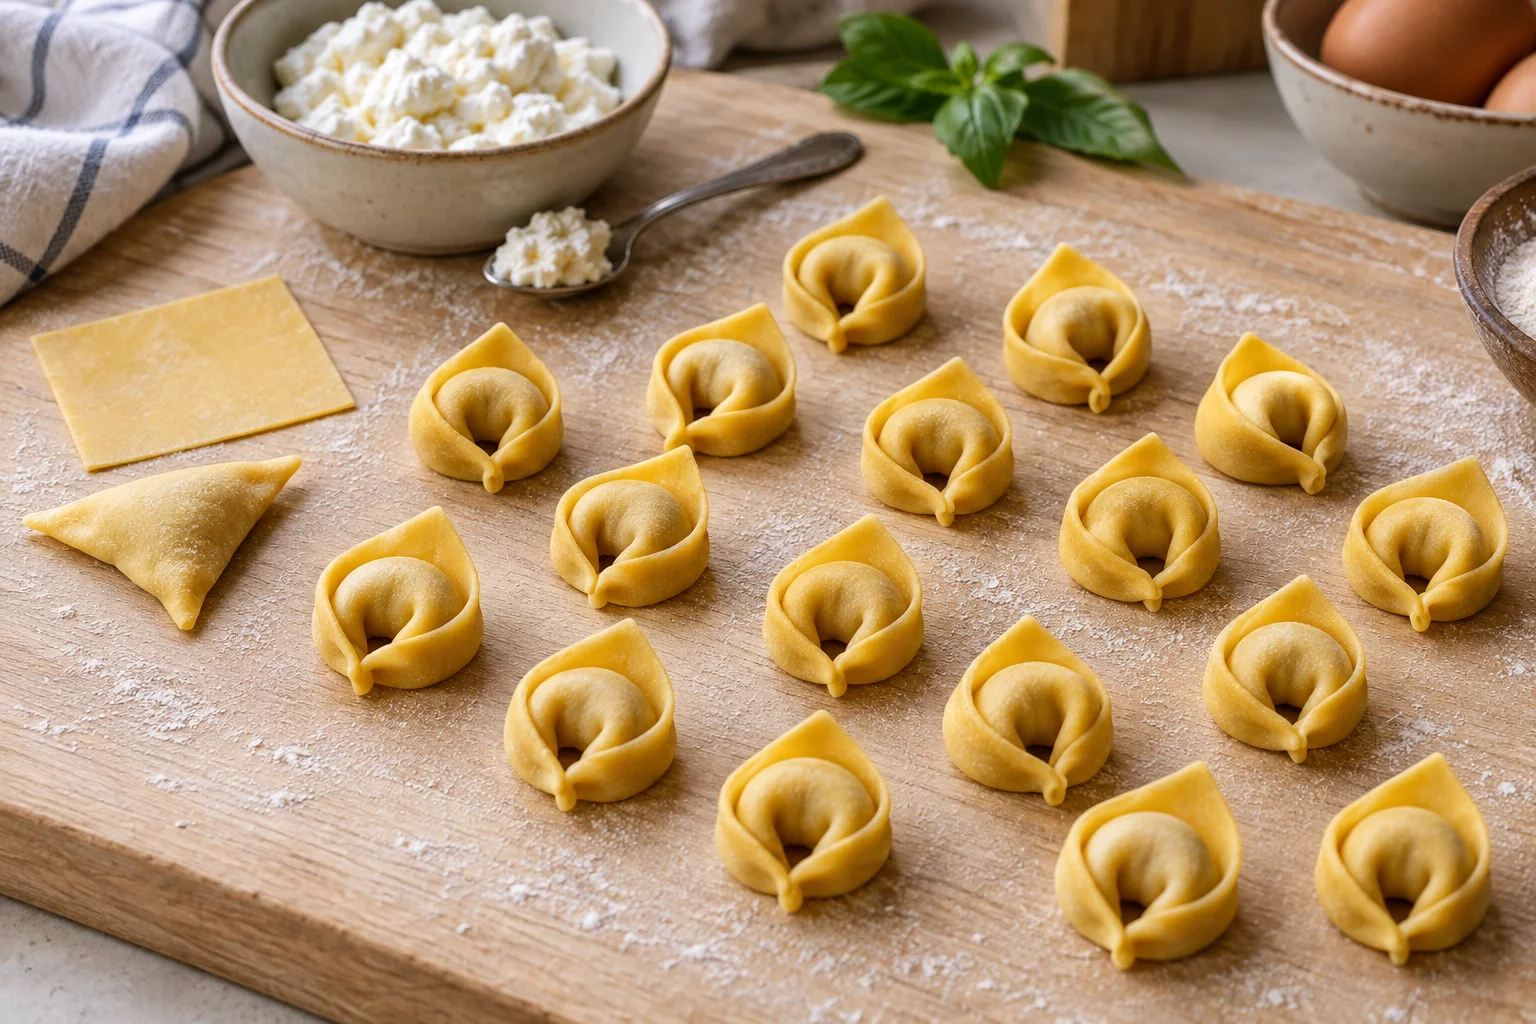
Shaping tortellini involves three repeated movements: fold a filled pasta square into a triangle, seal its two open sides and bring the outer corners together to form a ring. The small central opening appears during that final step. It is not a hole you push through the filled pocket. Slightly larger squares and a smooth, modestly portioned filling make the process easier to learn. Once the movement feels familiar, you can make smaller pieces. Consistent size is more useful at first than trying to make every ring exceptionally tiny.
The batch described here uses 200 grams of fine wheat flour and 110 grams of beaten whole egg weighed without the shells, plus approximately 200 grams of ricotta filling. Plan on about two main-course portions or three smaller starters, depending on how much dough and filling actually ends up in the parcels. A rolling pin or pasta machine, knife or pastry wheel, ruler, small spoons and a prepared tray are enough equipment. Allow roughly two to three hours for a first attempt, including preparation and refrigerated pauses. That does not mean leaving all the ingredients unrefrigerated for the entire session.
Prepare a smooth ricotta filling
Stir together 180 grams of well-drained ricotta and 20 grams of finely grated hard cheese. Season with a little pepper, a small pinch of nutmeg and salt if needed. Weigh the ricotta after draining. Let visible whey drain away through a sieve over a bowl in the refrigerator beforehand. The finished mixture should hold a small mound without releasing liquid. This filling needs no added egg: the measured egg belongs entirely in the dough. If you want a vegetarian dish, choose a hard cheese labelled as suitable for vegetarians.
Large shreds of cheese, long herb fibres and coarse pieces make small parcels harder to shape. Grate and chop finely rather than trying to force a chunky mixture through a tiny piping-bag opening later. Refrigerate the finished filling, covered, and take out only a small working amount at a time. Prepare it before rolling so that a thin sheet is not left waiting. Meat fillings are also common, but they require their own complete instructions for composition, refrigeration and thorough cooking. The cooking guidance for these small ricotta parcels cannot simply be transferred to them. Here, you can concentrate on learning the fold.
Knead the dough and let it relax under cover
Weigh 200 grams of flour and 110 grams of beaten egg after combining the eggs without their shells. Bring them together with a fork in a bowl, then use your hands to make a cohesive dough. Knead for approximately eight to ten minutes until smooth and even. If dry crumbs remain after gathering it thoroughly, continue with lightly dampened hands. Adding a large splash of water immediately can make the dough unnecessarily sticky. The 110 grams of egg refers to egg mass, not pure water: eggs also contain proteins and fat.
Rest the dough for about 30 minutes, tightly covered. It should relax without developing a dry skin. This is a rest, not fermentation, and there is no yeast in the mixture. Divide the roughly 310 grams of dough into four manageable working pieces of around 78 grams. These are not four eating portions. Roll one while keeping the others covered and refrigerated if the work takes longer. If a sheet repeatedly springs back, give it a short covered pause of a few minutes. Extra pressure and increasing amounts of dusting flour often make resistant dough uneven instead of helping it roll.
Roll thin sheets and cut even squares
Roll one working piece evenly to approximately 0.7 to 0.9 millimetres thick. Treat that as a guide: the dough should drape comfortably over the filling without becoming excessively thin and fragile. The seam will contain two layers, so a thick starting sheet remains noticeable after shaping. With a pasta machine, work gradually from a wide gap to a narrow one and follow the instructions for your particular model. A setting number does not transfer reliably between machines. When rolling by hand, work from the centre outwards and lift the sheet regularly to prevent it sticking to the surface.
Cut strips four centimetres wide, then divide them into four-centimetre squares. A ruler helps with the first row; the existing pieces can guide the next cuts. Cut only about six to eight squares at a time and keep the remaining sheet loosely covered without allowing it to stick together. The surface must stay flexible enough to seal. Very uneven rectangles can still be folded, but their corners meet less easily. Gather clean trimmings later and roll them once more after a short rest. Scraps smeared with filling should not be worked back into the plain dough.
Place small portions in the centre
For a four-centimetre square, begin with approximately one and a half grams of filling. This is a small dab, not a heaped teaspoon. A kitchen scale helps establish its size: ten such dabs weigh roughly 15 grams altogether. Use two small spoons to place the mixture centrally, or a piping bag with an appropriately sized opening. The amount is a starting point. If the triangle closes only when stretched, reduce the filling. The middle should have room to bulge while the surrounding surfaces remain clear for sealing.
Before folding, check the two sides that will meet. Neither ricotta nor thick traces of flour should cover them. Fresh dough often seals without extra water. If its surface already feels a little dry, brush the contact area with a barely damp finger or small brush. That is usually enough; the edge should not shine with water. Excess moisture makes the thin layer smear and harder to grip cleanly. An overfilled parcel will not improve if you squeeze it more forcefully. Remove a little filling while the square is still open in front of you.
Seal the triangle completely first
Lift one corner of the square and fold it diagonally onto the opposite corner. The filling now sits between two triangular faces. Drape the upper layer loosely over the mound rather than pulling it tight. Press gently near the filling and work outwards to release trapped air. Then seal both open sides fully with your fingertips. The long folded side is already connected. An even, narrow seam is sufficient; squeezing it very hard does not make it more reliable and may thin the dough immediately beside the filling.
Set the triangle down briefly and inspect it. Its central pocket should be closed, its sides neatly joined and both ends of the long folded edge free. If ricotta appears, either there is too much inside or some was already on the seam. Remove visible filling and carefully close the area if the dough is still intact. Use a fresh square if there is a larger tear. Bringing the corners together next creates the ring shape, but it does not repair an open filling pocket. This quick check before the final movement is therefore useful.
Join the outer corners into a ring
Hold the triangle with its long folded edge at the bottom and the single point facing upwards. Lift the two lower outer corners and bring them loosely around the tip of your little finger. The finger provides a shaping guide; do not use it to lever against the filled centre. Overlap the corners slightly and pinch them together where they meet. Withdraw your finger gently. You now have a small ring with a rounded filled pocket and an upright pasta point. A small opening should remain visible in the middle.
If the corners do not meet, avoid stretching them around a finger that is too large. Use only the narrower fingertip, curve the parcel carefully between your hands or reduce the filling in the next square. The pocket should neither be pulled apart nor flattened. Different hands produce slightly different rings; what matters is a closed seam and a firm connection between the tips. Place each tortellino separately on the prepared, lightly dusted tray. Do not press it upright into the flour. A natural slight lean is fine and puts less pressure on its soft base.
Correct common shaping problems
If the joined corners spring apart, first check for dry or heavily floured contact surfaces. A little targeted moisture and slightly more overlap help more than pressing the entire ring. A tear over the filling can mean that the sheet is too thin there, the mound is too large or the bend is too tight. If the triangular tip is hard and brittle, the cut dough has been exposed for too long. Work in smaller groups. Leaving a gap between completed pieces also prevents you from damaging several delicate edges at once when separating them later.
If the rings feel very thick and heavy, examine a cross-section: a thick sheet, wide compressed seams or several unnecessary folds are often responsible. Correct one of those issues in the next piece instead of changing everything at once. If you finish with more dough than filling, cut clean scraps into small noodles and cook them thoroughly in a separate batch. Keep leftover filling refrigerated and use it promptly in a fully cooked sauce. The aim is an even batch. The final parcels do not have to contain twice as much filling just to empty the bowl.
Cook gently and serve straight away
Bring a sufficiently large pan of salted water to the boil. Add only enough tortellini for them to move freely and reduce the heat to a gentle boil. Start checking freshly shaped small pieces from around three minutes. The final cooking time depends on the thickness of the pasta, its seam and the filling. Cut one through at the thickest point: the dough should be cooked and the centre hot throughout. Floating is not enough to establish this. A useful thorough-heating target is at least 70 °C for two minutes in every part; a food thermometer helps if you are uncertain.
Have the sauce ready before the pasta enters the water. A light coating is enough for this ricotta mixture: for example, melt 20 grams of butter over low heat and stir in an initial two tablespoons of hot cooking water. Lift out the cooked tortellini with a slotted spoon, let them drain and turn them gently in the sauce. Add a little more water if needed. Basil or a little pepper works with the mild cheese. Avoid vigorous tossing and prolonged further cooking. Alternatively, serve the pasta in a suitable hot broth, adjusting its salt level to the filling, which is already seasoned.
Work in small batches and freeze extra portions
Arrange the process so that only small quantities of chilled ingredients reach the worktop at any time. For egg dough, use approximately two hours of total room-temperature exposure as a simple limit, including mixing, resting and shaping, with less time in warm conditions. Break up a long session with refrigerated pauses and smaller working amounts. The refrigerator should be no warmer than 7 °C and preferably below 5 °C; follow stricter ingredient instructions where applicable. Refrigerate finished parcels promptly on a suitable tray if they are not being cooked immediately. Keep them separate and protected from both sticking and drying out.
For later meals, freeze the shaped raw tortellini separately until firm, then transfer them to a closed freezer-safe container. Label it with the date and ricotta filling. Cook them directly from frozen and check the thickest part again: the cooking time for fresh pasta no longer applies unchanged. Do not leave filled tortellini drying overnight on the worktop. Freezing does not reliably eliminate existing germs. Do not taste raw egg dough while shaping either. An orderly process with the filling prepared in advance leaves you more time to concentrate on the actual hand movements.